
Alligators are fascinating creatures that have intrigued humans for centuries. From their powerful jaws to their scaly skin, they are a wonder to behold. If you’re interested in learning how to draw these magnificent reptiles, you’ve come to the right place. In this tutorial, we will teach you how to draw an alligator step by step, so you can capture the essence of these amazing animals on paper.
Whether you’re an aspiring artist or just looking for a fun new hobby, learning how to draw an alligator is a great way to improve your skills and challenge yourself. With our easy-to-follow instructions and helpful tips, you’ll be able to create a realistic and impressive drawing of an alligator in no time. So grab your pencils and let’s get started!
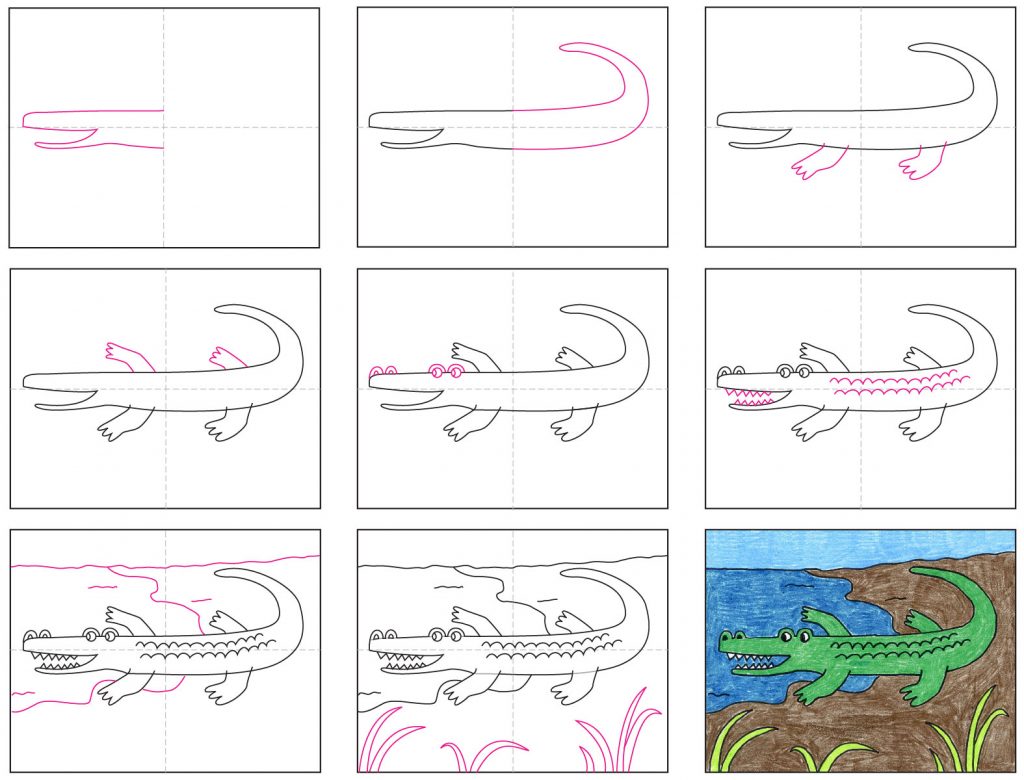
Learn how to draw an alligator step by step with these easy-to-follow instructions. Start by drawing the head, which should be long and narrow with a pointed snout. Then, add the body and tail, making sure to include the characteristic ridges on the back. Finally, draw the legs and feet, paying attention to the webbed toes. With a little practice and patience, you’ll be able to create a realistic alligator drawing.

How to Draw an Alligator Step by Step
Step 1: Draw the Alligator’s Body
To begin drawing an alligator, start by drawing the body. Draw a large oval shape for the body of the alligator. Then, draw a smaller oval shape for the head at the top of the body. Connect the two ovals with a slightly curved line to form the neck.
After drawing the body and head, add the legs. Draw four short and sturdy legs, each with three toes. The front legs should be shorter than the back legs, and make sure the legs are attached to the body and not the head.
| Tips: |
|---|
| Make sure the body and head are proportionate to each other. |
| Draw the legs wide apart to make the alligator look more stable and grounded. |
Step 2: Draw the Alligator’s Tail
Next, draw the alligator’s tail. It should be long and thick, tapering off at the end. Start at the back of the body and draw a line that curves downward and then back up again. Connect it to the body with a small curve. Then, continue the tail with a series of curved lines that gradually taper off.
Add small triangles along the top and bottom of the tail to represent the scales. Make sure the tail is thick and muscular, as it is an important part of the alligator’s body.
| Tips: |
|---|
| Make sure the tail is proportionate to the body and head. |
| Add texture to the tail to make it look scaly. |
Step 3: Draw the Alligator’s Head
Now it’s time to draw the alligator’s head in more detail. Start by drawing the eyes. They should be small, almond-shaped, and placed on either side of the head. Draw a small circle inside each eye to represent the pupil. Then, draw the snout by drawing a wide, curved shape that goes from the eyes to the nose.
Add the nostrils by drawing two small ovals on the tip of the snout. Draw the mouth by drawing a curved line under the snout, and then add some small, sharp teeth along the line.
| Tips: |
|---|
| Make sure the eyes are placed in the correct spot, as they are an important part of the alligator’s expression. |
| Add texture to the snout to make it look scaly. |
Step 4: Draw the Alligator’s Details
After drawing the basic outline and features of the alligator, it’s time to add some details. Start by adding the alligator’s scales. Draw small, overlapping ovals all over the body, tail, and legs. These scales should be smaller and tighter together on the alligator’s belly and larger and more spaced out on the back.
Next, add some shading to the alligator’s body to give it depth and dimension. Shade in the areas where the alligator’s body overlaps and where the light would hit it the least.
| Tips: |
|---|
| Use a reference image to help you draw the scales accurately. |
| Be consistent with the size and spacing of the scales. |
Step 5: Color the Alligator
Now that you’ve drawn the alligator, it’s time to color it in. Alligators are usually green or brown, so choose a shade that you like and color in the body, legs, and tail. Color the belly a lighter shade of the same color. Make sure to leave the scales white to make them stand out.
Add a darker shade of the same color to the areas where the alligator’s body overlaps or where the light would hit it the least. Finally, add a highlight to the alligator’s eyes to make them look shiny and alive.
| Tips: |
|---|
| Use different shades of the same color to give the alligator a more realistic look. |
| Be careful not to color outside the lines. |
Step 6: Add Background
To make your alligator drawing look even better, add a background. Draw some trees, bushes, or a swamp behind the alligator to give it a more natural setting. You can also add some birds or other animals to make the scene more interesting.
Use different shades of green and brown to color in the background. Make sure the background is not too distracting and does not take away from the main focus of the drawing, which is the alligator.
| Tips: |
|---|
| Make sure the background is proportionate to the alligator. |
| Use different shades of green and brown to give the background depth and dimension. |
Step 7: Practice Makes Perfect
Drawing an alligator can be challenging, but with practice, you can master it. Keep practicing and experimenting with different techniques to improve your skills. Look for inspiration from other artists or nature itself.
Remember to have fun and enjoy the process of drawing. Don’t be too hard on yourself if your drawing doesn’t turn out perfect the first time. Keep trying, and you’ll get there eventually.
| Benefits: |
|---|
| Drawing helps improve hand-eye coordination and fine motor skills. |
| Drawing can be relaxing and therapeutic. |
Step 8: Alligator Drawing vs. Alligator Photo
Drawing an alligator from a photo can be a great way to practice your skills and get inspiration. However, it’s important to remember that a drawing is not the same as a photo.
A drawing is an interpretation of the subject, and it can be stylized or exaggerated. A photo, on the other hand, is a representation of the subject as it is. So, while a drawing may not be as realistic as a photo, it can still be a beautiful and unique representation of the subject.
| Vs: |
|---|
| A photo is a more accurate representation of the subject. |
| A drawing can be more stylized and unique. |
Step 9: Alligator Drawing Ideas
If you’re looking for more ideas on how to draw alligators, there are many resources available online. You can find step-by-step tutorials, videos, and images to help you improve your skills.
You can also try drawing alligators in different styles, such as cartoon or realistic. Experiment with different colors and backgrounds to give your drawings a unique look.
| Tips: |
|---|
| Look for inspiration from other artists, nature, or online resources. |
| Experiment with different styles and techniques. |
Step 10: Conclusion
Drawing an alligator can be challenging, but with practice and patience, you can create a beautiful and unique representation of this fascinating animal. Remember to start with the basic shape and add details gradually. Use different shades of the same color to give the alligator depth and dimension, and add a background to complete the scene.
Most importantly, have fun and enjoy the process of creating something new. Drawing can be a relaxing and rewarding hobby, and it’s a great way to improve your skills and express your creativity.
Frequently Asked Questions
Learn how to draw an alligator step by step with these common questions and answers.
What are the tools needed to draw an alligator?
To draw an alligator, you will need a pencil, eraser, paper, and a black pen for outlining. You may also want to use colored pencils or markers to add color to your drawing once you’ve finished.
It’s important to have a good quality pencil that can create both light and dark lines. An eraser will also help you correct any mistakes while you’re drawing.
What is the first step in drawing an alligator?
The first step is to draw a large oval for the alligator’s body. Then, add a smaller oval for the head and connect the two shapes with a long, curved line for the alligator’s neck.
Once you have the basic shape of the alligator, you can begin adding details such as the eyes, snout, and legs.
How do you draw the alligator’s eyes and snout?
The alligator’s eyes are small and round, and they should be placed near the top of the head. Draw two small circles for the eyes and shade them in with a pencil. For the snout, draw a long, pointed shape that extends from the head and curves slightly downwards.
Don’t forget to add the alligator’s nostrils and mouth, which should be located at the end of the snout. The mouth should be open and show the alligator’s teeth.
What is the best way to draw the alligator’s legs?
The alligator’s legs are short and stubby, with three toes on each foot. Draw the legs coming out from the body at an angle and add the toes using short, curved lines. You can also draw the alligator’s tail, which should be long and pointed with ridges along the top.
Once you have all the basic shapes for the alligator, you can add details such as scales and texture to make your drawing look more realistic.
How do you add color to your alligator drawing?
You can add color to your alligator drawing using colored pencils, markers, or paint. Alligators are typically green or brown with lighter underbellies, but you can use your imagination to create a unique color scheme.
Start by filling in the basic shapes with color and then add shading and highlights to create depth and dimension. Don’t forget to blend your colors to create a smooth, realistic look.
How To Draw A Cartoon Alligator
In conclusion, drawing an alligator step by step can seem daunting at first, but with a little practice and patience, anyone can master it. Remember to start with the basic shapes and build upon them gradually, paying close attention to the details that make an alligator unique.
Don’t be afraid to experiment with different techniques and styles to make your alligator drawing truly your own. Whether you’re a beginner or an experienced artist, the key is to have fun and enjoy the process of creating something new.
With these tips and tricks, you’ll be able to draw alligators like a pro in no time. So grab your pencils and paper, and let your creativity run wild as you bring these fascinating creatures to life on the page. Happy drawing!
