
Are you interested in learning how to draw a rattlesnake? Look no further! In this tutorial, we will guide you through the process step by step, making it easy for even beginners to follow along.
Drawing a rattlesnake may seem daunting at first, but with a few simple techniques, you’ll be able to create a realistic and impressive image in no time. So grab your pencils and let’s get started!
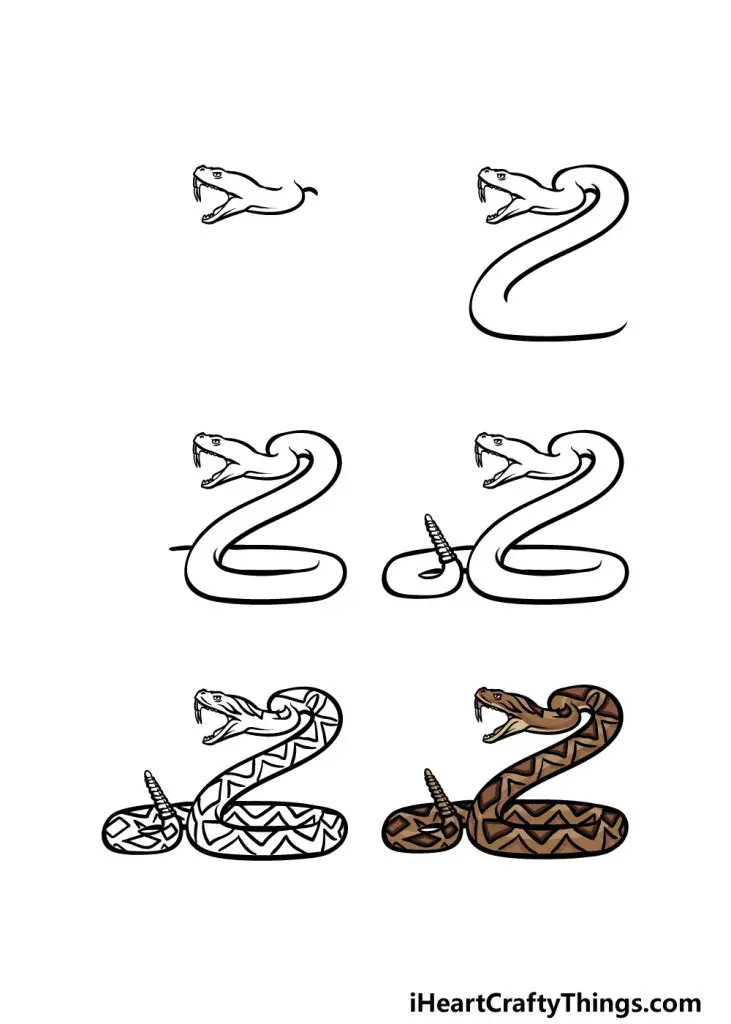
Learn how to draw a rattlesnake step by step with this easy tutorial! First, sketch the head and body shape with a light pencil. Then, add the details such as the eyes, nostrils, and tongue. Next, draw the scales along the body and tail using curved lines. Finally, add the rattle at the end of the tail. With practice, you’ll be able to draw a realistic rattlesnake in no time!

How to Draw a Rattlesnake Step by Step Easy
Drawing a rattlesnake may seem difficult, but with some basic knowledge and a few tips, you can create a stunning masterpiece. In this article, we will guide you through the process of drawing a rattlesnake step by step.
Materials Required
Before we begin, let’s gather the necessary materials. You will need a pencil, eraser, paper, and a reference image of a rattlesnake. You can find reference images easily on the internet.
To get started, we will begin by drawing the head of the rattlesnake.
Step 1: Draw the Head of the Rattlesnake
First, draw a small circle to represent the eye of the rattlesnake. Then, draw a curved line that extends from the eye to the back of the head. Draw a slightly curved line beneath the head to represent the lower jaw.
Next, draw a series of small triangles above the eye to create the scales on the head. Draw a long, curved line extending from the back of the head to represent the body of the rattlesnake.
Step 2: Draw the Body of the Rattlesnake
Draw a curved line extending from the head to create the top of the body. Draw a second curved line beneath the first to represent the underside of the snake.
Next, draw a series of small triangles along the top and bottom of the body to create the scales. Draw a small, curved line at the end of the body to represent the tail of the rattlesnake.
Step 3: Add Details to the Rattlesnake
Now it’s time to add some details to the rattlesnake. Draw a small, triangular shape at the end of the tail to represent the rattle. Add some texture to the scales by drawing small lines within each triangle.
Draw small, circular shapes within the eye to represent the pupil of the snake. Finally, erase any unnecessary lines and darken the final lines of the drawing.
Benefits of Drawing a Rattlesnake
Drawing a rattlesnake can be a fun and rewarding experience. It can improve your hand-eye coordination, attention to detail, and patience.
Additionally, drawing snakes can help you overcome your fear of them. By studying and drawing snakes, you can gain a greater appreciation for their beauty and importance in the ecosystem.
Rattlesnake Drawing Vs Photograph
Drawing a rattlesnake allows you to create a unique and personalized representation of the animal. While a photograph can capture the intricate details of a snake, a drawing allows you to add your own artistic flair and interpretation.
Furthermore, drawing a rattlesnake can be a more relaxing and meditative experience compared to taking a photograph. It allows you to slow down and appreciate the beauty of the animal in a more intimate way.
Conclusion
In conclusion, drawing a rattlesnake step by step is an enjoyable and fulfilling experience. With the right materials and a bit of patience, you can create a stunning representation of this amazing animal. Remember to take your time, practice, and enjoy the process of drawing.
Frequently Asked Questions
What materials do I need to draw a rattlesnake?
To draw a rattlesnake, you will need a pencil, eraser, paper, and colored pencils or markers. It’s important to have a reference image of a rattlesnake to guide your drawing. You can find images online or in books about snakes.
When choosing your paper, it’s best to use a thicker, heavier weight paper to prevent smudging. For the coloring process, colored pencils or markers work well, but you can also use paints if you prefer.
What are the basic steps to draw a rattlesnake?
The first step to drawing a rattlesnake is to sketch the basic shape of the snake’s body. Start with a long, curved line for the spine and add smaller curves for the body segments. Next, draw the snake’s head, which should be triangular in shape with a bulge for the eyes.
After you have sketched the basic outline, you can add details such as the rattles at the end of the tail, the scales on the snake’s body, and the patterns on the skin. Finally, color in your drawing using the reference image as a guide.
How can I make my rattlesnake drawing look more realistic?
To make your rattlesnake drawing look more realistic, focus on adding details to the scales and patterns on the snake’s skin. Use shading to create depth and texture, and vary the size and shape of the scales to make them look more natural.
Pay attention to the proportions of the snake’s body and head, and make sure they are accurate. You can also add shading to the snake’s head to create the illusion of shadows and highlights. Finally, make sure the colors you use are realistic and match the reference image.
What are some common mistakes to avoid when drawing a rattlesnake?
One common mistake when drawing a rattlesnake is making the body too thick or too thin. It’s important to pay attention to the proportions of the snake’s body and make sure it looks realistic. Another mistake is making the rattles too big or too small, which can throw off the balance of the drawing.
Another mistake to avoid is making the patterns on the snake’s skin too uniform. Rattlesnakes have unique patterns that vary from snake to snake, so it’s important to create a natural-looking pattern that matches the reference image. Finally, be careful not to smudge the drawing as you work, especially if you are using colored pencils or markers.
How long does it take to draw a rattlesnake?
The amount of time it takes to draw a rattlesnake depends on your skill level and the level of detail you want to include in your drawing. For a simple, basic drawing, it may take 30 minutes to an hour. For a more detailed, realistic drawing, it could take several hours or even days to complete.
It’s important to take your time and not rush the drawing process. If you need to take a break, it’s better to step away from the drawing and come back to it later with fresh eyes. Remember, practice makes perfect, so keep working at it and you’ll see improvement over time.
How To Draw A Rattlesnake
In conclusion, drawing a rattlesnake step by step can be a fun and engaging activity for both kids and adults. With the right tools and techniques, anyone can create a stunning piece of artwork that captures the unique features of this fascinating creature.
Whether you’re a beginner or an experienced artist, following these easy steps can help you master the art of drawing a rattlesnake. From sketching the basic outline to adding details and shading, each step brings you closer to creating a realistic and impressive rendition of this iconic snake.
So why not give it a try? With a little bit of patience and practice, you’ll soon be able to create a beautiful drawing of a rattlesnake that you can be proud of. So grab your pencils and paper, and let your creativity flow!
