
Are you interested in drawing a rattlesnake but don’t know where to start? Look no further! This step-by-step guide will teach you how to draw a realistic rattlesnake that will impress your friends and family.
From the intricate details of the scales to the iconic rattle on its tail, this guide will cover everything you need to know to create a stunning image of this fascinating creature. So grab your pencils and let’s get started on this exciting drawing adventure!
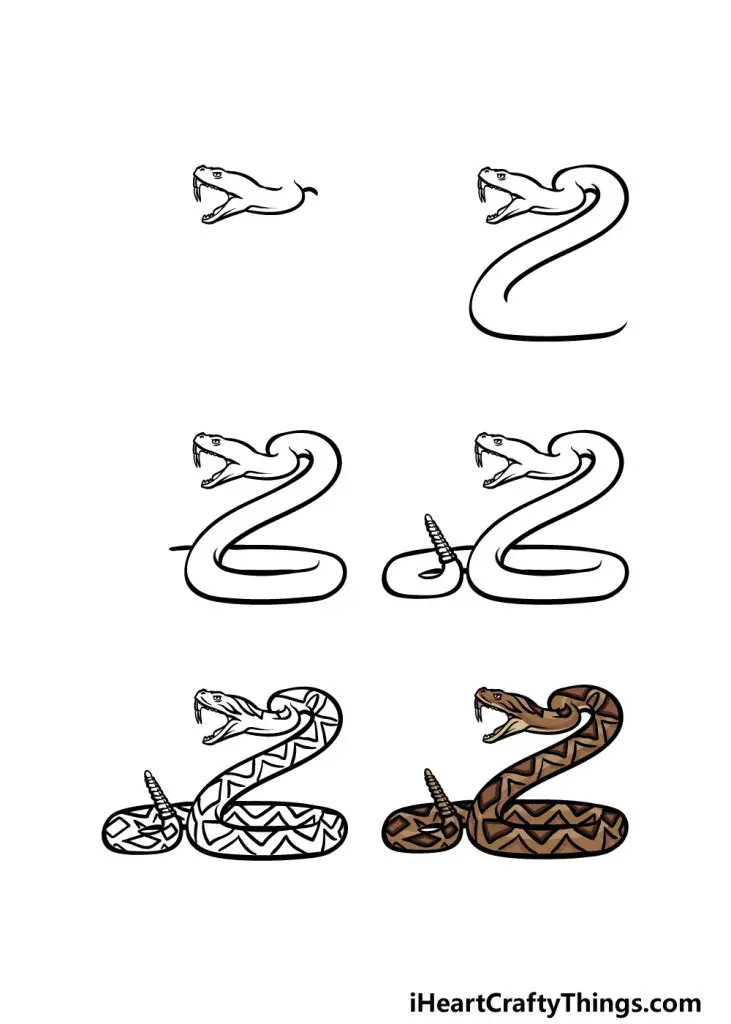
To draw a rattlesnake step by step, follow these instructions:
- Start by drawing the head of the rattlesnake with a curved line.
- Next, draw the body of the rattlesnake by making a series of S-shaped curves.
- Draw the rattlesnake’s tail by making a few small triangles at the end.
- Add the eyes, nostrils, and mouth to the head of the rattlesnake.
- Finally, add the scales to the body of the rattlesnake, using small curved lines to represent each scale.

How to Draw a Rattlesnake Step by Step
Are you interested in learning how to draw a rattlesnake? Drawing a rattlesnake may seem daunting at first, but with the right techniques and guidance, you can create a realistic and stunning image. In this article, we will provide step-by-step instructions on how to draw a rattlesnake, from the initial sketch to the final details.
Materials Needed
Before we begin, it’s essential to have the right materials. You will need a few tools to create a realistic and detailed drawing of a rattlesnake.
- Pencil
- Eraser
- Paper
- Reference Image of a Rattlesnake
Step 1: Sketch the Head
Start by drawing the head of the rattlesnake. Draw a circle for the head and add a curved line for the mouth. Sketch the eyes and nostrils and add a curved line for the top of the head.
In the second paragraph, add details on how to sketch the head. Explain the shapes and angles to create a realistic-looking head.
Step 2: Draw the Body
Next, draw the body of the rattlesnake. Use curved lines to create the shape of the snake’s body. Add a line for the belly and a line for the back of the snake.
In the second paragraph, add details on how to create the body of the rattlesnake. Explain the shapes and angles to create a realistic-looking body.
Step 3: Add Details
Once you have the basic outline of the rattlesnake, it’s time to add details. Draw the rattles at the end of the snake and add scales to the body. Add shading to create depth and dimension.
In the second paragraph, add details on how to add details to the rattlesnake drawing. Explain how to create the scales and shading to make the drawing look realistic.
Step 4: Refine the Drawing
Take a step back and evaluate your drawing. Look for areas that need refinement and make any necessary adjustments. Add more shading and details to make the drawing look more realistic.
In the second paragraph, add details on how to refine the rattlesnake drawing. Explain how to make adjustments and add more details to make the drawing look more realistic.
Step 5: Final Details
Once you are satisfied with the drawing, add final details. Add texture to the scales and shading to create depth. Use an eraser to clean up any smudges and make the drawing look polished.
In the second paragraph, add details on how to add final details to the rattlesnake drawing. Explain how to add texture and shading to make the drawing look more polished.
Benefits of Drawing a Rattlesnake
Drawing a rattlesnake can be a fun and rewarding experience. It allows you to improve your drawing skills and create a beautiful piece of art. Additionally, it can help you develop patience and attention to detail.
In the second paragraph, expand on the benefits of drawing a rattlesnake. Explain how it can improve your drawing skills and help you develop patience and attention to detail.
Rattlesnake Drawing Vs. Photography
While photography can capture the beauty of a rattlesnake, drawing allows you to create a unique and personalized interpretation. Drawing a rattlesnake allows you to add your own artistic style and creativity to the image.
In the second paragraph, expand on the comparison between drawing and photography. Explain how drawing allows for a unique and personalized interpretation of the subject.
Conclusion
Drawing a rattlesnake may seem intimidating at first, but with the right materials and techniques, it can be a fun and rewarding experience. Follow these step-by-step instructions to create a beautiful and realistic drawing of a rattlesnake. Remember to be patient and take your time to refine your drawing and add final details.
In the second paragraph, summarize the article and reiterate the importance of patience and taking time to create a realistic and beautiful drawing.
Frequently Asked Questions
Here are some common questions and answers for those looking to draw a rattlesnake step by step.
What materials do I need to draw a rattlesnake?
To draw a rattlesnake, you will need a piece of paper, a pencil, an eraser, and some colored pencils or markers if you want to add color to your drawing. You may also find it helpful to look at pictures of rattlesnakes to get a better idea of their texture and coloring.
When choosing your paper, consider using a heavier weight paper or a sketchbook with thicker pages to prevent smudging and ghosting from your pencil marks.
How do I start drawing a rattlesnake?
Begin by lightly sketching the basic shape of the rattlesnake’s body using your pencil. Start with the head and the curves of the body, then add the tail and any other details like the rattles or patterns on the skin.
Once you have the basic shape, add in details like the eyes, nostrils, and mouth. Use light pencil strokes at first so that you can easily make changes as needed.
What are some tips for drawing the texture of a rattlesnake?
Rattlesnakes have a scaly texture that can be challenging to replicate in a drawing. One tip is to use a cross-hatching technique to create the illusion of scales. This involves drawing lines in different directions to create a woven texture.
You can also use a stippling technique, where you create texture by adding small dots or marks to the drawing. Experiment with different techniques to see what works best for you.
How do I add color to my rattlesnake drawing?
When adding color to your rattlesnake drawing, start by choosing the colors you want to use. Rattlesnakes typically have a brown or grey base color with darker markings or patterns.
Use colored pencils or markers to add color to your drawing, starting with light layers and building up the color as needed. Take your time and blend colors together to create a realistic and lifelike drawing.
What are some common mistakes to avoid when drawing a rattlesnake?
One common mistake is to make the rattlesnake’s head too small or too large in proportion to the body. Pay attention to the size and shape of the head in relation to the rest of the body.
Another mistake is to make the scales or patterns too uniform. Rattlesnakes have natural variations in their skin patterns, so try to replicate this in your drawing to make it look more realistic.
How To Draw A Rattlesnake
In conclusion, learning how to draw a rattlesnake step by step can be a fun and rewarding experience. By following the easy-to-follow instructions and using the right tools, you can create a realistic and impressive drawing of this iconic reptile.
One of the key things to keep in mind when drawing a rattlesnake is to pay attention to the details. From the shape of the head to the patterns on the skin, every aspect of the snake’s appearance is important to capture in your drawing.
With practice and patience, you can master the art of drawing a rattlesnake step by step and take your skills to the next level. So why not give it a try and see what you can create? You may be surprised at what you can accomplish!
